Friday, April 30, 2010

Feeling Esprit! Spanish walk vs trot

So ever since the new mold Esprit came out, I have seen many cool customs, but one thing has been nagging me....how many times a spanish trot is called a walk. This is a great example of making sure to reference what you are doing with photos from real horses. This is a great reference, on the right is a spanish walk, the left is a spanish trot. In a nutshell, for it to be a spanish walk the hind leg diagonal from the raised front leg should be BEHIND (or is some cases close to even yet off the ground) the opposing hind leg. In the trot, the diagonal hind leg is forward and raised in reference to the opposing hind leg (hind leg on same side as raised front leg)


Below is a great example of a correct spanish walk....

This horse IS trotting, but that hind leg should be more engaged to be as correct as the friesian above. But still, it is raised and in front of the opposing hind leg.

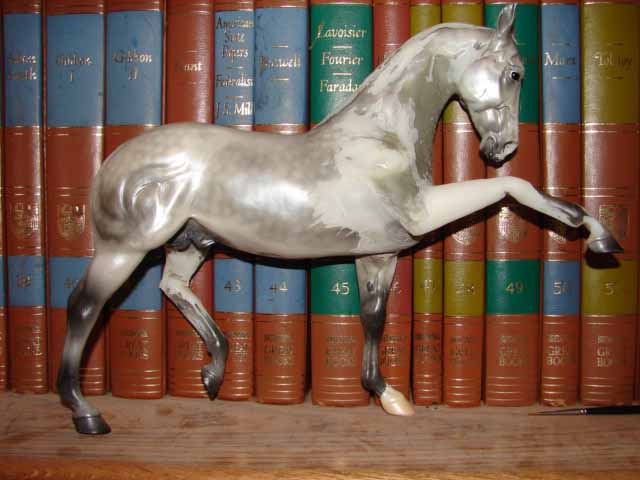
So to me, the Epsrit would be best to remake into a spanish TROT. I think he has a stock horse look to him as well as spanish, since he has a nice short head with an almost dished profile, so I intend for him to be an Azteca. First of all I look the model over.....and I notice that the raised upper portion of the raised front leg is longer than the one on the ground. To do this I use a caliber with sharp points on the end. Its almost 1/4" difference, doesn't seem like much but on a real horse that would be over 4 inches! Imagine what a real horse with one front leg 4 inches longer than the other would look like! I do this all over the model, and notice that one cheek is way bigger than the other as well, and the hock where the tail is attached is way thicker than the other...so these are things I want to change. I just can't leave stuff like this alone! I got the caliber at Hobby Lobby in a drafting set. You can get a cheap plastic one from Dick Blick too. Just don't use a compass, the ends are not symmetrical and it will screw up your measurements


Look at the difference between the two!


Here is the poor cut in the rough cut stage. I just did NOT like the shoulder muscles since they are so thick, so both side got sanded down. I totally cut the left shoulder off at the point. I notched the raised front leg to clean up that knee, took off the mane and sanded it way down so I could build up a better neck. I took the tail totally off. Spanish and stock horses typically are not flaggy tail horses, so I want to make a nice relaxed and lower tail set. I also completely dremel off that right hock area. I know it seems like more work, but the more you get rid of in this stage the cleaner and less bulky your remakes will look in the end


Here is what the tail area looks like. The tail is built on a aluminum wire, 12 gauge. Notice I sculpt the new tail and the whole surrounding area to make sure the apoxy has a large surface are to bond to. Just putting the tail in and sculpting right around it will for sure lift off in time. I also put an airhole between the horses hind legs. DO NOT FORGET THIS! It really cuts down on long term lifting issues.


Here is what his new neck look likes and you can see the rebuilt cheek on this side. Notice how much cleaner the knee area looks (well to me anyway!)


His off side with the new hock area resculpted, you can see I dremel down this cheek and have yet to add in the wrinkle detail on that side. He balances well on his tail. For tail balancing tips, do all the other resculpting first, every horse tends to tilt one way or the other, then use the tail to balance. I have pop cans on each side of the horse to hold it while the first layer of tail drys.


So what do you think for the mane...right side or left? I always do both sides of the neck with equal detail and then add the mane. If you think, oh I don't have to do this side so carefully since the mane will be there, trusy me that whole side will not end up as nice!
Lastly, I never work on just one horse. I only get so much time down in the dungeon away from the kids so I work on another horse while one dries in front of the heater. Here is the other victim.
Next week its remaking resins to be tack friendly, run Scarlet run!


Hmmmmmm what color should the little filly be??????


Monday, April 26, 2010

Show Adventures!

This past weekend I had the AWESOME adventure of getting to fly out east to an all performance show. Now this was quite the challange, since I love to compete for overall championships, but with minimal space I only brought enough to get these last few horses qualified for NAN this year. But what was really special was getting to spend the weekend with my uber gal pal Liesl, and getting to go to U CONN! I am a huge sports nut, and this is one of my favorite pictures, Ray Allen's U Conn jersey in their basketball hall of fame. I won't bore you with the rest of them, but it was an incredible rush to walk around that great sports hall!


Here is Katerina W, NAN qualifying in western ranch work. I totally didn't think to take pictures on the table since I was having too much fun talking to everyone, go figure right?

This is not the side saddle she will be show in at NAN, but she looked amazing in it, such a great little performance model, this mold can do about anything.
And this turned out incredible! Jen did an fantastic job sizing the in hand set without having the actual horse. He won the other performance class and I can not wait to show this set up at NAN!


Little Narasabi won the big English Games class in all Braymere tack playing broom polo...it looked cooler on the show table with the footing and all! But hmmmmm, poor be note that the bridle is a little different color than the saddle...oh no what to do Jen? Can you make me suffer so????? LOL


And the ABSOLUTE best part of the weekend, other than spending time with a special friend, was we left the show early so we could enjoy the beautiful weather and go for a trial ride by the CT river. This is me on Liesl's draft cross mare Lilly. It was Lilly's first trail ride and she was super, took the lead and went where ever I asked. Even riding in one of these goofy western thingy saddle (okay I am a prissy dressage rider, what can I say) it was heaven on earth! Lilly is a good size mare too, I am 5'9", and we fit well together.


So the moral of the story, if you can get a chance to go somewhere TOTALLY new and show, its a great test of your showing ability and you get to meet wonderful new people!
Tomorrow lets hack up and Esprit!


Wednesday, April 21, 2010

Getting Ready For a Show

I happen to be really lucky and have many local live shows, but sometimes I end up flying to a show. This presents a HUGE problem for me. In case you haven't caught on, I have just a few pieces of tack, and when flying space is an issue, so I have to pick and pack JUST what I need. This is nearly impossible for me since I like to bring everything with! So I get each piece out what I think I will use, and try it on the horse to make sure it fits ahead of time. Normally if it doesn't, no biggie, just grab another out of the box...oh if only I could take it all with!
So this first saddle is my "Hidalgo" saddle made by Kathy. The details on this set are unreal, right down to the laced canteen


Mom wait, take my picture too!!!! What can I say, she get it from her father! giggle

This is Narasabi, my Nahar remade to a mare with a Khemo head. Not a flashy halter horse, I wanted a performance arab. As a shower of real arabs, I just love how often you see a little kid riding around on a full sized horse that willingly goes through anything. There are high strung arabs for sure, my the performance bred ones and really fantastic horses and truly love children. Kathy made me this saddle just for her since she has a short back. Shannon made the bridle.


The doll I already had, and all I did was describe it to Kathy, and she finds this saddle pad that matches perfectly. I have decided that Kathy's stash and packratting ability far exceeds my own, which is downright scary. I really need to set up an inside studio picture place, I did buy a backdrop, should be here next week.


Look I made some tack! This historical high school set is designed for the piebald alborozo in the courbette (the same one Jen made the in hand set for). I do NOT like making tack, but suffered through this..ouch ouch


Wow these are all dark! Sorry for this, will take better pictures at the show of these tack pieces, they really are amazing!


And yes, its true, I have a few things that are pink, just a few here and there
cough cough
So I have it all packed, now it just has to fit in the trunk. Thankfully Liesl is letting me use a lot of her props, otherwise I would never make it. This is the first time I have flown to a performance show, other than NAN last year, so a bit nervous I have forgotten something. Won't be back on line till the weekend, am going to try and post from the airport with my laptop, should be interesting to say the least. Next week, the remaking of Esprit, no more icky shoulders and the difference between a spanish walk and a spanish trot!


Tuesday, April 20, 2010

Purdy Picture Day

True story....
So after I got married I went to the bank to change my name...this young guy is waiting on me
me "I need a change of name form for marriage"
him "okay, so whats your new name?"
me "Its Purdy"
him "well I am sure it is darling, but what is your new name?"
oh well, with a name like Purdy what can you expect? The kids call my husband and I (he is also a science teacher) the Nerdy Purdys. If the shoe fits what can you do?

so how bout some Purdy Pictures!

One of these things is not like the other..........can you tell which? What can I say, at the Purdy Farm, we are all purdy friendly, regardless of what you look like!
Emma, the cow, is going to calve in a month. I have foaled out many a horse, but this will be my first bovine. The other two are arabian crosses, the palomino is also a morab, the little chestnut is a quarab.


Okay this is from a year ago, but Payton just loves her kitties! These two kittens were dropped off in a box one day, they have both grown into wonderful pets. The light grey is Payton's "best friend", well thats what Payton says every day!
And just wanted to show what all can be done with those resin heads, below is the same iberian head that was featured on the Jennet model yesterday, here it is on an ISH body as an azteca!
Kathy made this amazing parade set. I only got to show it, believe it or not I had to mail it back!!!!!!! and yes, I was twitching and foaming at the mouth when I did it. I do NOT like ever parting with beautiful tack, even when I know its on loan! This set top tenned at NAN in 2008.


Here is the endurance set people commented on. This set has won TWO national championships for me on two different horses! Here it is on Molly, a customized breyer Flash.


And here is another shot....packing for the show this weekend, will get a couple new pictures of the historical set I actually made myself...shocking, I know!


Monday, April 19, 2010

Feeding the Addiction

Is this really an addiction??? I mean these are the only english saddles I have (minus my racing saddle, and my pebbles saddles..and maybe a few more that were in the other tack box).....Oh Jen and Shannon you are just silly!
Be that as it may....I have no intention on entering any type of program, Tiger Woods can have those all to himself! I prefer to keep feeding the habit. If anyone has any Jen Buxton, Shannon Granger, or Kathy Wiggins goodies they want to part with I will always be happy to take the goods in trade!

But I wanted to give a preview of the next remaking victim, Jen's Scarlet that she WILL have for her May show, along with some other new ponies


And speaking of feeding the habit! I got a box on Friday with this amazing plantation saddle, or Bayoona (spelling?). Here is the set up with Kathy's boyfriend (well I mean come on, who wouldn't want a man on a horse with a jug full of shine?) complete with gator (okay bullfrog) skin suspenders, boots, and hatband. Kathy made this amazing set..at the upcoming show I will get some pictures of just the saddle. The stitching on the seat is unreal! Complete with posable bullwhip. Here he is driving the Spanish Colonial cattle in front of him. Down south in the swampy pastures driving the cattle was the only effective way to move them about. Just look at that swampgrass! (otherwise known as Illinois crabgrass)

Here is Katerina W, the Spanish Jennet (spanish colonial horse). I love this model! I have another Godiva that will get remade to a pinto version of a Jennet that eventually Kathy and I will show together, but for now just Katerina W. I am traveling out east this weekend for a performance show and she will be my main show horse.

The new spanish head, really these resin heads can make SUCH a different, and its easy to do!


Here is an angle showing him off with the momma cow and calf....


Slightly different angle


And the cows! Cracker cows (Spanish Colonial cattle) are so cool! They have all kinds of neat horns and come in so many colors. She is actually bridle, but with the intense sunlight its hard to see. This is a Herden heifer I remade with horns, more crest, and an full udder. The calf is just a breyer calf repaint. Having unique props can add so much to your entry!


This week the posts will be kinda short, gotta get ready for the upcoming show, I am so looking forward to a weekend away! But next week some more resin remaking and a Espirit custom!

I have been having trouble updating the sales page link, but to let you know the Matriarch is sold, thank you so much for all of the people that asked.


Friday, April 16, 2010

Training Barn, TGIF!

So to start off the day I would like to share a funny with you. I LOVE my teaching job, it is so much more rewarding than the chemist job I had before. BUT there are days I worry.....for example, we are learning about freshwater systems and cave formation. So I tell the kids (and Bfest travelers this goes for you too) if you ever get a chance to visit Mammoth Cave National Park in Kentucky that is an amazing site...
One of my darlings ask "So do Mammoth's live there still?"
Why yes, yes they do.......

So here is the Jennet, I sprayed over the pattern, then start to go back and paint in the centers of the spots, leaving a mapped edge. You can see how I changed the tail structure to better look like a horse with a Paso ancestory (no flagging tails!)

This is how she looked before, sorry for the picture being up twice!


and here is today's training barn member, Zips Caramel Creme. A matriarch with a lowered head and neck and new wind blown mane. She has done well in halter and performance for me.


Her off side, showing her extensive dapples


A view showing how she is designed to be a quiet, performance friendly mare.


Here she is winning a large trail class. I plan to show her at NAN in halter, western, and other performance. So again, you can make time payments to be finished after NAN. I have her priced at $900 postage paid. She was made from a solid cast body, so she is not a light weight. This tack set here was made by another tack goddess Shannon Granger, who trust me, her story is coming soon!


Will be finishing up the Jennet this weekend, and her companion, a spanish colonial cow!
Keep tuned in for details, thanks so much for reading!


Thursday, April 15, 2010

Basket Case

Painting Leopard Appaloosas
It can turn you into a basket case! This is my youngest Payton, who loves to "camp out" downstairs sometimes. The basket case is Pixel, the cutest little cat ever. She was dropped off at our farm last summer. We have no idea how old she is, but is still only 5 pounds of sweetness that has to be involved in everything

I start with reference pictures, I think the key to painting a nice appy pattern is to learn to align the spots with the direction of the hair coat. Here you can see how the spots follow the hair lines on the face. You don't have to copy the pattern exactly, but following the hair lines is key.
Below is a black leopard appaloosa remade Alborozo. This horse is a multi live show winner and is owned by Gail Aspenwail. I paint all my appy spots by hand. I just do not like the overspray look that can come with airbrushing spots on, but that is my taste. Everyone has their own technique, thats what makes it fun!

I start out by shading all the indents with a light pink color by airbrush, with a layer of warm white over it. Then if I want a semi roan look a brush on some grey, chestnut (or black), and white pastels. I dab the powder on with a soft round brush. I use all kinds of pastels, even eye shadows. BUT the softer pastels blend super easy, so dabbing the color on works best, otherwise the colors just smear together.


Sorry for the low light, but you can see I only put color on the forehand and legs of the horse with the pastels, leaving the butt area white. I use dull coat to fix the pastels, it give the paint some tooth so the color layers up more.


Then the basic spot pattern. I use a small Filbert shaped brush and stroke each spot on following the direction of the coat. The spots are thin, you can see through them a bit, but this is only the first layer. Also, Kathy got to thinking and this horse has more arch in its tail than a Jennet should, (pasos hold their tails flat) so I am going to flatten out that arch tail tonight. Do NOT be afraid to change something you notice as a bit off once you start. Trust me, if you don't, it will call to you in your sleep!


Wednesday, April 14, 2010

Heads away!

Little Helpers....
Does anyone else have helpers like these? We have many farm cats, a few are true pets that come inside as well. This is my Geeza, who insists on helping me with everything. I had to finally bribe her with treats to keep her out of my way. I did get a tripod, horray!


This is the memphis belle resin with the new head. I also braided her up with a mud tail for a different look. With this resin I made metal ear shapes that I inserted in the head and sculpted over. I use thin aluminum sheet that I get at a craft store.
Here is a close up of the head. Keep in mind, this resin was fine the way she was, I just wanted to give it a new look. To me the biggest problem with resins is that when you go to show you end up with so many of the same mold in the class. I am always trying to improve my paint jobs, but I don't have the ability to do thousands of dollar paint jobs, so I try to do something else to make my pieces unique.


Below is the Godiva, a totally new look with relativly little work.


Here is her off side, she will be sporting a chestnut leopard appy paint job next!


And finally the stablemates from last week! These new molds are great! The reiner already left to his new home, but here are some others!


This stablemate is a head swap too, a combo of the G3 jumper body, walker head, and wire hind legs for stability. Freddie the Fabulous Flyer is a special piece for a friend that really wanted my NAN mule from two years ago. Now I WILL NOT copy special pieces, I will do a lot of Lady Phases with their heads down, but never the exact same color. I won't remake another Lady Liberty, but plan to make a parked out big lick walker stallion...so my point is, be original!


Lastly the little drafter, he got sold too, a simple custom, but a totally new look!


next I will do a painting bit, showing how I do leopard apps. I am by far not the best at it, but its a technique I think everyone can do.